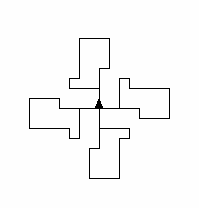
 Project 1
Project 1: What is a Shape?
The purpose of this project is to give you chance to break down simple problems (such as drawing a logo) into precise steps that solve the problem (draw the logo). In computer science speak, you will be developing algorithms. In this case you will write your algorithms as sequences of Python turtle commands that make the turtle draw complicated shapes for you.
Tasks
- If you haven't already set yourself up for working
on the project, then do so now.
- Mount your directory on the Personal server.
- Open the Terminal and navigate to your project1 directory on the Personal server.
- Open TextWrangler. If you want to look at any of the files you have already created, then open those files.
- Invent a shape, such as a cross, or an L or a simple chair. The next instruction is to write Python code to make the turtle draw the shape, so keep the shape fairly simple.
- Create a file called shapeA.py in your
project1 directory. It should follow the same basic format as
the python file we made in lab, so make sure the first and last lines in shapeA.py
are the same (the import and input lines). Between
those lines, put the turtle commands to draw the shape you just
invented. Run the program (i.e. type
python3 shapeA.pyin the terminal) and take a picture of the shape (i.e. Shift-Cmd-4).Include a picture of this shape in your write-up. This is required image 1.
You can take a screen shot by using cmd-shift-4 and then clicking and dragging the part of the image you want to capture. The file will be saved on your Desktop.
- Repeat your process for a second shape, putting its
code in a file named shapeB.py.
Include a picture of the new shape in your write-up. This is required image 2.
- Make a new Python file called shapes.py. As the name
implies, this file will have code that draws more than one shape. We
will begin by putting the shapeA and shapeB code into it as
functions. We will then create a shapeC function that is composed of
shapes A and B.
-
Create two functions shapeA and shapeB. A
function is simply a collection of Python commands with a label,
just like our lists above. For example, I could make a function
that draws a triangle by use the following code.
def triangle():
   forward( 100 )
   left( 120 )
   forward( 100 )
   left( 120 )
   forward( 100 )
   left( 120 )
Note how the commands that make up the function are all tabbed in the same amount relative to the function definition. That is how you tell Python those commands are part of the function triangle. In Python the visual indentation of the text has the semantic meaning that the indented text is part of the function labeled as triangle. Not all programming languages give semantic meaning to the visual organization of the code, but Python does. That means that the way Python code looks also has something to do with how it works.
Your shapeA and shapeB functions should draw the shapeA and shapeB shapes you defined in the prior step. You can copy and paste that code into the functions, tabbing in the code appropriately.
- Invent a shape C that is composed of shapeA and shapeB. The
code for shapeC will call the functions for shapeA and
shapeB. You can call a function in Python by using the function
name followed by parentheses. For example, the following code
creates a function called shapeC that does three things. First
it executes the code in the shapeA function, then it moves the
turtle forward by 100 pixels, then it executes the code in the
shapeB function.
def shapeC(): shapeA() forward( 100 ) shapeB() shapeC() input('Enter to continue') - At the end of your shapes.py file, put a call to the shapeC function, as in the example above. That will tell Python to call the function when you run the shapes.py program. Note that the call to shapeC is not tabbed in and will therefore be executed by Python when you execute your file. Recall that the role of the final line of code is to keep the turtle window open until you are ready to let it go away. It does so by preventing the program from ending without you pressing Enter/Return.
-
Test your code (i.e. run it by typing
python3 shapes.pyin the Terminal). If it doesn't work, then carefully read any error message. It should direct you to the line of the file that failed to work. Some common errors include the following.- Syntax error: Forgetting the colon at the end of a function definition line
- Syntax error: Forgetting to pair a left parenthesis with a right parenthesis. Without a closing parenthesis, Python doesn't know where to stop reading.
- Typo: Misspelling a turtle commmand or function name. These are some of the most difficult bugs to spot. Fortunately, Python will tell you the line number where the error is located. The error will often be that the misspelled symbol (word or name) has not been defined.
- Tabbing/White Space error: Having
inconsistent tabbing. All code should be lined up
carefully. The main code should have no spaces or tabs at the
beginning of the line. The code "inside" a function
definition should be tabbed in once, with all lines tabbed in
the same amount.
Note that Python considers tabs and white space to be different things, which is sometimes hard to debug because all of your code looks correct. If you think your code is correct, then select all of your code (cmd-A) and then choose Text::Entab in TextWrangler to convert all of your white space to tabs or Text::Detab to convert all of your white space to spaces. That will generally correct the problem if the error is mis-matched white space.
-
Create two functions shapeA and shapeB. A
function is simply a collection of Python commands with a label,
just like our lists above. For example, I could make a function
that draws a triangle by use the following code.
-
The final task is to make your shape-drawing functions more flexible
by enabling the caller to specify how many pixels forward to
travel. For example, consider the triangle-drawing function
above. Each triangle edge is always 100 pixels.
It would be better to have a triangle that could be drawn many different sizes. In other words, instead of using a raw, or hard-coded number to indicate the forward distance, it would be better to have the distance be adjustable. In programming terminology, this means we would like to use a parameter for the distance instead of a hard-coded number. You can create parameters for functions that allow you to pass information into a function. In the function definition, you put a list of parameter names inside the parentheses. You can then use the parameter names within the function.
When you call a function with parameters, you put the value of the parameters in the parentheses. For example, the following code defines a triangle and then calls it with two different values.
def triangle( distance ):
   forward( distance )
   left( 120 )
   forward( distance )
   left( 120 )
   forward( distance )
   left( 120 )

triangle( 50 )
triangle( 100 )
- In the file shapes.py, create a shapeD function that draws a shape (like shapeA or shapeB) and uses one of more parameters in the forward commands, just like the triangle function above.
- Also in the file shapes.py, write a shapeE function that calls the shapeD function multiple times with different parameters.
-
Test your code. This means run it and make sure it works. If it
doesn't work, then carefully read any error message. It should
direct you to the line of the file that failed to work. In addition to
the errors listed above, you may see the following error.
- Argument/Parameter Mismatch error: Having a mismatch between the number of values passed in to a function when it is called and the number of parameters that function has defined (e.g. the triangle function needs 1 parameter, so both lines below will cause errors because the actual function wants one parameter.
triangle()
triangle( 4, 3 )
Include a picture of the new shape in your write-up. This is required image 3.
Extensions
Each assignment will have a set of suggested extensions. The required tasks constitute about 85% of the assignment, and if you do only the required tasks and do them well you will earn a B+. To earn a higher grade, you need to undertake one or more extensions. The difficulty and quality of the extension or extensions will determine your final grade for the assignment. One complex extension, done well, or 2-3 simple extensions are typical. Choose extensions that you find interesting and challenging.
The following are a few suggestions on things you can do as extensions to this assignment. You are free to choose other extensions.
- Create some additional functions that draw different shapes. Create a function that calls all of them to make an interesting graphic.
- Write a function that will draw an N-gon. It should take in the distance of a side and the number of sides.
- Figure out how to have a set of instructions repeat a certain number of times.
- Build a hierarchy of functions. For example, suppose you already have a function shapeG that draws one shape. Make a new function shapeH that calls function shapeG multiple times, but in different places, so that you get multiple shapes. Then make another function shapeJ that calls shapeH multiple times. Go up one more level of complexity.
Writeup and Hand-in
There are two parts to handing in your project: handing in your code, and writing a brief report on the wiki.
Turn in your code
You will turn in your code by putting it in a directory in the Courses server. On the Courses server, you should have access to a directory called CS151. Within the CS151 directory is a directory with your user name. Within this directory is a directory named Private. Files that you put into that Private directory you can edit, read, and write, and the professor can edit, read, and write, but no one else. To hand in your code and other materials, you will create a new directory inside the Private directory, such as project1, and then copy your code into the project directory for that week. Note: This directory may not be available during lab, but will become available during the week before the projects are due.
There are two ways to mount the appropriate directory.
- Option 1: Load the root server directory and navigate to your directory.
You can mount the Colby fileserver root directory by going to the Finder and typing cmd-K, or selecting 'Connect To Server...' from the Go menu. It will bring up a dialog box, into which you want to enter the following.
Mac: smb://filer.colby.edu/Courses Windows: \\filer.colby.edu\Courses Then click on the CS151 directory, and then your hand-in directory (it will have your username as its name).
- Option 2: Mount your directory directly.
You can mount your personal directory explicitly using the the following path in the 'Connect To Server...' dialog.
smb://filer.colby.edu/Courses/CS151_VM/<username>
Turn in your code by putting all of the necesary files into a project1 directory inside of your Private directory on the Courses server. To hand in your project code, copy shapeA.py, shapeB.py, and shape.py to your project1 directory on the Courses server. If you wrote additional Python files, you should hand them in as well. We will grade all files turned in, so please do not turn in old, non-working, versions of files.
Write Your Report
In lab, you made a new wiki page
for your assignment. Put the label cs151f17project1 in the label
field on the bottom of the page. But give the page a meaningful title (e.g. Bruce's Project 1).
In general, your intended audience for your write-up is your peers not in the class. From week to week you can assume your audience has read your prior reports. Your goal should be to be able to use the wiki report to explain to friends what you accomplished in this project and to give them a sense of how you did it. Follow the outline below.
- A brief summary of the task, in your own words. This should be no more than a few sentences. Give the reader context and identify the key purpose of the assignment.
- A description of your solution to the tasks, including the required images (3 for this project) and any other images you created to demonstrate concepts in the project. This should be a description of the form and functionality of your final code. For this project, you should also include a description of the programming process, and refer to your first image. You may want to incorporate code snippets in your description to point out relevant features. Note any unique computational solutions you developed. Code snippets should be small segments of code--usually less than a whole function--that demonstrate a particular concept. If you find yourself including more than 5 lines of code, it's probably not a snippet.
- A description of any extensions you undertook, including images demonstrating those extensions. If you added any modules, functions, or other design components, note their structure and the algorithms you used.
- A brief description (1-3 sentences) of what you learned. Think about the answer to this question in terms of the stated purpose of the project. What are some specific things you had to learn or discover in order to complete the project?
- A list of people you worked with, including TAs, and professors. Include in that list anyone whose code you may have seen, such as those of friends who have taken the course in a previous semester.
- Double-check the label. In lab, you should have added a the label cs151f17project1 to your wiki page. Make sure it is there.