 Project 4
Project 4: The Warhol Project
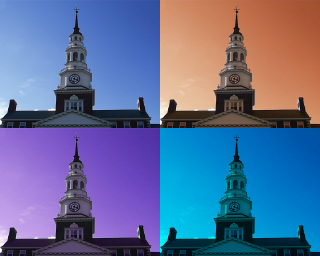
The purpose of this project is to make a collection of images in the style of Andy Warhol. You'll do this by manipulating the pixel colors of an image.
Here is the reference guide to the graphics package.
Tasks
Make sure you have copies of the graphics.py and display.py files in your working directory.
For this assignment you're going to create two python programs. One will generate a Warhol style collage. The other will change the blue screen to a different color. Both will write their results to an image file, which you can then view with your show program.
- Write a function that will place one image inside another
In your filter.py file, create a function placeImage which takes four arguments. The first argument will be a destination Image, the second argument will be a source Image, and the last two arguments will be an x, y location to place the second Image into the first.
Using a nested for loop over the rows and columns of the source image. If i is your row loop variable and j is your column loop variable, get the pixel values from the source image at location (j, i), then set the pixel values in the destination image at location (x+j, y+i).
+ (more detail)
The function outline in comments is given below. For each comment inside the function below, you need to write one line of python code.
# place src into dst with upper left at x, y in dst
def placeImage( dst, src, x, y ):
    # assign to rows the height of the src image
    # assign to cols the width of the src image
    # loop over each row i in src
        # loop over each column j in src
            # assign to the tuple (r, g, b) the result of calling getPixel on src with arguments (j, i)
            # using dst, call the setPixel method to set location (x + j, y + i) to the color (r, g, b)
The setPixel function expects a Zelle color. You can create a Zelle color using the function graphics.color_rgb(r, g, b). The color_rgb function expects values between 0 and 255 for each color channel.
Once you are confident that your placeImage function works, please remove the comments that we supplied. They don't help the reader understand the overall purpose of the code because they are a line-by-line annotation of what each line does. In most cases, that is obvious from the code itself. Helpful comments include the docstring (which you need to write), which explains the meaning of each parameter.
- Test your placeImage function
Once you have written your function, you can use this file to test it. Run the test program on the command line and give it an image filename as its argument. For example:
python testPlaceImage.py miller.ppm
If you look at the end of test program, you will see that it writes the output to a file called duplicate.ppm. You can use your show.py program to view the duplicate.ppm image. It should show two copies of the original image, side-by-side.
As you are working with your code, remember that the Zelle graphics package can read only PPM type images.
- Write three more photo filters
Create three more photo filters that edit the colors in a Image to achieve some effect. See if you can emulate some of the Instagram effects. Your filters need to do more than simply reordering the color channels (though you are welcome to write them in addition to your three, if you like the effect).
Some examples of good single pixel filters to try include:
- Make a sepia tone version of the image
- Make a color negative
- Apply a gamma correction (brighten or darken shadows)
- Modify the white balance
- Emphasize or saturate a certain color
- Produce a vignette effect (darker around the edges)
- Enhance or decrease the contrast
- Quantize the colors (i.e. allow only 4 levels each of red, green, and blue)
If you want to get a little fancier, you can try some filters that use information from multiple pixels. Think carefully before trying it.
- Blur an image
- Sharpen an image
- Produce an edge image
- Write a function to generate a Warhol style image
Your main warhol program (which you should put in a file named warhol.py) should read in one image, create four copies of it, use your filter functions to alter them, create a new blank image that is width*2 by height*2 and then use the placeImage function to insert the four edited images. Finally, it should write out the collage image.
+ (more detail)
The code below is a skeleton of the algorithm.
def main(argv):
    # if the length of argv is less than 2
        # print a usage statement
        # exit

    # assign to a variable (e.g. img) the result of reading in the Image from argv[1]
    # clone img and assign it to a new variable (e.g. map1)
    # clone img and assign it to a new variable (e.g. map2)
    # clone img and assign it to a new variable (e.g. map3)
    # clone img and assign it to a new variable (e.g. map4)

    # call your first manipulator function on map1
    # call your second manipulator function on map2
    # call your third manipulator function on map3
    # call your fourth manipulator function on map4

    # create a new Image that is 2*width x 2*height and store it in a new variable (e.g. collage)

    # put map1 into the collage at (x, y) = (0, 0)
    # put map2 into the collage at (0, height)
    # put map3 into the collage at (width, 0)
    # put map4 into the collage at (width, height)

    # save the big image (e.g. collage) to a file
Tip: For this function, helpful comments would indicate the different sections of code (e.g. "read in one image", "make 4 copies of it", "make an empty image big enough to hold 4 copies of this one", and "put the 4 filtered images into the big one"). And, of course, a docstring is a must.
Finish up this task by putting a call to main inside the conditional statement we've used before. Then call your python program and view the collage.
In your report, include a picture of your Warhol-style image. This is required picture 1.
- Write a program to modify the background of a green/bluescreen image
Get your photo taken with the green or blue screen. Until you do, you can use this image.
The last task is to create a python program that reads in a blue/green-screen image and turns the background pixels to a different color. Call it greenscreen.py or bluescreen.py, depending on the background color of the image. (The images will be placed in Courses/CS151/CourseMaterials). The rest of the pixels should remain untouched.
The function will need to loop over each pixel in the image and test if it is very blue/very green. If it is very blue/very green, change its color. Otherwise, leave it alone.
A reasonable test for 'very green' is if the green channel is 1.5 times the red channel and also bigger than the blue channel. You can do something similar to define 'very blue'.
In your report, include a picture demonstrating an altered background. This is required picture 2.
Follow-up Questions
- What is a pixel?
- What is the difference between an image filename and an Image object?
- Why are nested for loops useful for manipulating images?
- Who was Andy Warhol?
Extensions
Extensions are your opportunity to customize your project, learn something else of interest to you, and improve your grade. The following are some suggested extensions, but you are free to choose your own. Be sure to describe any extensions you complete in your report. Include pictures.
- Create a larger or more complex Warhol style collage. Place the images in a pattern more complicated than that of a square (but not random!).
- Do something more interesting than a single color to replace the blue screen.
- Place yourself in a scene. Start with a background scene that is the same size image as your blue-screen image. Then copy only non-blue pixels from your images into the background. You can do this by making a version of placeImage that copies only non-blue pixels. You could call it placeImageWithoutBlue.
- Enable your Warhol program to read in multiple images from the command line and make a collage for each one, or a collage that integrates several images.
- Make a function or functions that modify the image based on one or more parameters and demonstrate that you can make several different output images by varying the parameter.
- Make more interesting filters.
Submit your code
Turn in your code (all files ending with .py) by putting it in a directory in the Courses server. On the Courses server, you should have access to a directory called CS151, and within that, a directory with your user name. Within this directory is a directory named private. Files that you put into that private directory you can edit, read, and write, and the professor can edit, read, and write, but no one else. To hand in your code and other materials, create a new directory, such as project1, and then copy your code into the project directory for that week. Please submit only code that you want to be graded.
When submitting your code, double check the following.
- Is your name at the top of each code file?
- Does every function have a comment or docstring specifying what it does?
- Is your handin project directory inside your Private folder on Courses?
Write Your Project Report
If you haven't already made a new page for this report on the wiki, then make one now (Log into the wiki, goto your Personal space by selecting "Personal Space" on the menu under the Person icon, then make the page using the "Create" button. Put the label cs151f19project4 in the label field on the bottom of the page. But give the page a meaningful title.
Your intended audience for your report is your peers not in the class. From week to week you can assume your audience has read your prior reports. Your goal should be to be able to use it to explain to friends what you accomplished in this project and to give them a sense of how you did it.
Your project report should contain the following elements.
-
A brief summary of the project, in your own words. This should be no more than a few sentences. Give the reader context and identify the key purpose of the assignment.
Writing an effective abstract is an important skill. Consider the following questions while writing it.
- Does it describe the CS concepts of the project (e.g. writing well-organized and efficient code)?
- Does it describe the specific project application?
- Does it describe your the solution or how it was developed (e.g. what code did you write/circuits did you build)?
- Does it describe the results or outputs (e.g. did your code work as expected)?
- Is it concise?
- Are all of the terms well-defined?
- Does it read logically and in the proper order?
- A description of your solution to the tasks, including images you created (including the required images mentioned above). This should be a description of the form and functionality of your final code. Note any unique computational solutions you developed or any insights you gained from your code's output. You may want to incorporate code snippets in your description to point out relevant features. Code snippets should be small segments of code--usually less than a whole function--that demonstrate a particular concept. If you find yourself including more than 5-10 lines of code, it's probably not a snippet.
- A description of any extensions you undertook, including text output or images demonstrating those extensions. If you added any modules, functions, or other design components, note their structure and the algorithms you used.
- The answers to any follow-up questions (there will be 3-4 for each project).
- A brief description (1-3 sentences) of what you learned. Think about the answer to this question in terms of the stated purpose of the project. What are some specific things you had to learn or discover in order to complete the project?
- A list of people you worked with, including TAs and professors. Include in that list anyone whose code you may have seen, such as those of friends who have taken the course in a previous semester.
- Put the label cs151f19project4 on your wiki page.