CS 151 Fall 2025 Syllabus Labs/Projects
Project 5: Meme Generator & Green Screen
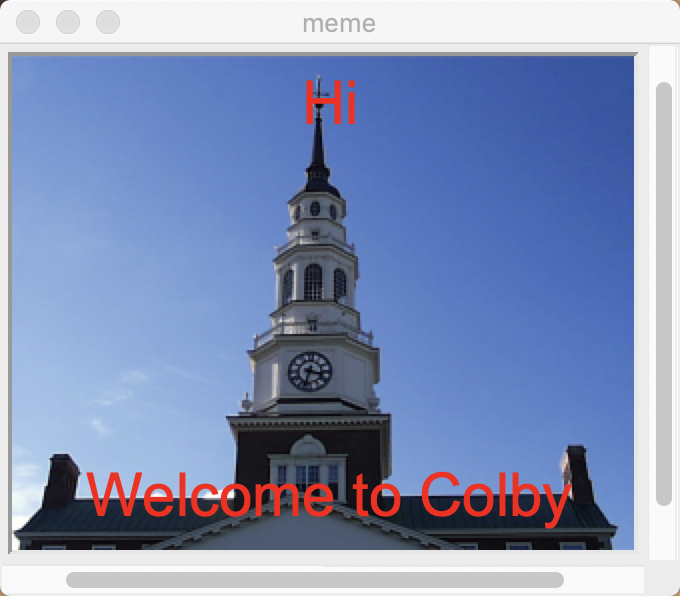
In this project, you will arrange images and text to create memes. You will use lists to organize which images and text goes where in your grid.
Tasks
- Project 5: Meme Generator & Green Screen
1. Create a Single Panel Meme Generator
Make a copy of show.py and rename it meme.py
1a. Create a Single Panel Meme
In your main function of meme.py create two text objects, one centered at the bottom of the image and one centered at the top of the image. Choose a font size and color that is visible
Draw the text objects after the image is drawn.
Run your code to make sure it produces the correct result.
1b. Use Command Line Arguments to Control the Image and Text
Allow the user to pass in two optional command-line arguments to meme.py. The first string will be the text for below the image, and the second string will be the text for above the image. Be sure to pass the command line arguments as function parameters to your main function and change your Text object constructors to use those parameters. Give empty strings as the optional function argument for your two new parameters.
Here is an example of showing the image miller.ppm with the top text top text "Hi" and the bottom text "Welcome to Colby". (Like the image at the top of this project).
python3 meme.py miller.ppm "Welcome to Colby" "Hi"
Imagine giving meme.py or show.py to a friend and they tried to run your code. The program would crash with a unhelpful error message because they don't know that they need to pass in the image filename as a command-line argument (try it!). Frustrating!
From now on, you will be expected to print a proper usage statement if your program uses command-line arguments (so that the user knows how to run your program!).
In both meme.py and show.py, check the number of command-line arguments that the user passes in. If the user does not pass in enough command-line arguments, print out how to run your code without crashing. Here is a good example:
Usage: python3 show.py <filename of image>
Call the exit function right after printing out the message to stop the program cleanly without crashing.
Test running meme.py and show.py with the correct and incorrect number of command-line arguments. For example, running show.py:
- with no command line arguments should print out your message and exit "cleanly" without crashing.
- with one command-line argument (the filename) should work like before.
1c. Create 2 memes with different command line arguments
In your project folder, create a new folder called images. Put two png or ppm images in the images folder that you would like to use for your memes.
Take a screenshot of the meme that you created with 2 command line arguments this is Required Image 1 in your project. In your report include the command line arguments you used to produce the meme.
Take a screenshot of the meme that you created with 3 command line arguments this is Required Image 2 in your project. In your report include the command line arguments you used to produce the meme.
2. Green screen image meme
2a. Green screen filter
Create a new file called greenscreen_meme.py.
Write the function that will replace the green background in your green screen image with another image, a photo of an exotic beach scene exotic.ppm (click on link to download image). You can think of the background replacement process as applying a special kind of filter to your green screen image:
- As you visit every RGB pixel in your green screen image, determine if the pixel is "very green".
- If it is, replace the pixel value with the one from the exotic image.
- Otherwise, keep the pixel in the image as-is.
Make a greenscreen function in greenscreen.py with the following signature:
def greenScreen(greenImg, otherImg):
'''If a pixel in `greenImg` is very green, replace it with the corresponding pixel in `otherImg`.

A reasonable test for 'very green' is if the green pixel is 1.5 times the blue channel and also bigger than the red pixel.
Play around with the 1.5 number to see if you can get better results.

The function returns the updated `greenImg` object.
'''
where otherImg is the "exotic beach image" object. The function should implement the logic outlined in the above bullet points and docstring.
Hint:
Recall that each pixel in a color image has three values (r, g, b). Each pixel is addressed by its row ("y") and column ("x"). The height of the image tells us the number of rows and the width of the image tells us the number of columns.
The Graphics module contains two functions that make it easy to get and set pixel values if you have an Image object. The three lines below demo how you would:
- read in a
Imagefrom a file (which you did above) - get the RGB values at the pixel at x = 42 and y = 35.
- replace the RGB values of the pixel at x = 42 and y = 35 by twice their current values.
img = graphics.Image((0,0), 'myImage.ppm')
(r, g, b) = img.getPixel(42, 35)
img.setPixel(42, 35,(2*r, 2*g, 2*b))
2b. Use Command Line Arguments to Control the Green Screen Image and Text
Modify your main function to call your greenScreen function and assign the returned image to a variable. Use the newly created image for the image in your meme generator code.
Allow the user to pass in three optional command-line arguments to greenscreen_meme.py. The first string will be the text for below the image, the second string will be the text for above the image, and the third string will be the filename of the photograph of something in front of a green screen. Be sure to pass the command line arguments as function parameters to your main function and change your greenscreen function to use those parameters for the background and foreground image.
python3 greenscreen_meme.py <filename of background image> <bottom text> <top text> <filename of greenscreen image>
Use your greenscreen_meme.py to create a new meme.
Take a screenshot; this is Required Image 3 in your project. In your report include the command line arguments you used to produce the meme.
Check your code!
In order to grade your project, we need to be able to run your code and get the same results as you do!
In your project submission ZIP file, please include any PPM images that are needed run your code.
Here is a summary of the expected outputs from each of the source code files that you created:
- Prints a usage statement and does not crash.
python3 meme.pypython3 greenscreen_meme.py
- In a new window display the image passed in by command-line arguments. (see note about command-line arguments below).
python3 meme.py <image filename>python3 greenscreen_meme.py <image filename>
- In a new window display the image passed in by command-line arguments, with the bottom of the image.
python3 meme.py <image filename> <bottom text>python3 greenscreen_meme.py <image filename> <bottom text>
- In a new window display the image passed in by command-line arguments, with the top text at the top of the image, and the bottom text at the bottom of the image.
python3 meme.py <image filename> <bottom text> <top text>python3 greenscreen_meme.py <image filename> <bottom text> <top text>
- In a new window display the green screen image overlayed ontop of the original image passed in by command-line arguments, with the top text at the top of the image, and the bottom text at the bottom of the image.
python3 greenscreen_meme.py <image filename> <bottom text> <top text> <greenscreen image filename>
If you use command-line arguments in any file, please explain what they are and provide an example way to run your code in either code comments or your report.
Extensions
Congratulations on completing the core tasks! Between the code that you’ve already written and the report that you write, you’ve already earned up to 26/30 points for this project. If you turn it in by the first deadline that's 27/30 points.
The remaining 3/30 are a chance for you to earn credit for exploring parts of this project and digging deeper to express your creativity! This is entirely optional; 27/30 is an A- and is a perfectly respectable place to stop. Extensions are open-ended and exist to compliment the structured core project. Explore and learn something new that interests you! Concentrating your energy on 2 "deep" extensions that challenge you will earn you more points than many small, "shallow" extensions.
You can pick your own topics that interest you. Here are a few examples:
- Control other aspects of your memes using command-line arguments. (.5-1pts)
- Create a multipanel meme. (1-1.5pts)
- Explore other objects from the graphics library and add shapes to your memes. (.5-1pts)
- Explore other objects from the graphics library and create an additional complex scene. (1-1.5pts)
- Figure out how to have objects in the graphics window change when you click on a portion of the window. (1-1.5pts)
To get credit for your extensions, you must document them in your report. For each extension this includes:
- A description of your extension and how it fulfills one of the above tasks.
- A screen shot (or multiple) of your extension.
- An explanation of how you implemented your extension.
Submission checklist
To turn in your project, make sure you do all of the following:
- Check the rubric in Google Classroom and make sure your report and code contain all the required parts.
- Rename your project folder to include your Colby username. For example, I would name mine
hewolfe_Project5.zip. - Create a zip file of your project.
- Attach (drag) the zip file to the posted project assignment on Google Classroom.
- Click "Turn In" on the Project 5 assignment in Google Classroom.