CS 151 Spring 2024 Syllabus Labs/Projects
Project 6: Image Manipulation & Andy Warhol
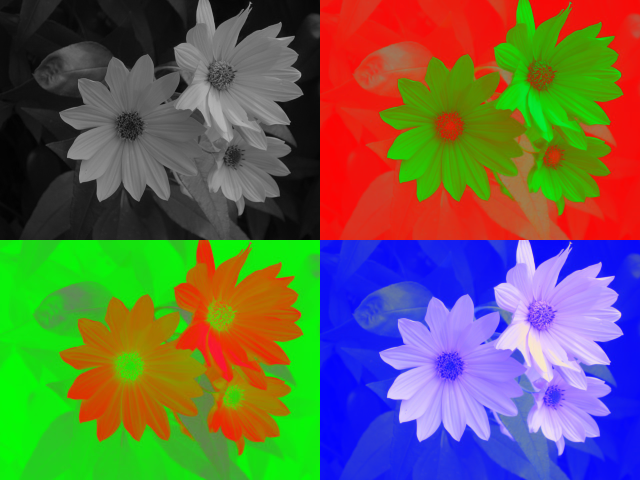
In this project, you will arrange your filtered versions of an image in the style of Andy Warhol within a 2x2 grid. You will also create an "image filter" to remove the green background of a green screen photo and place yourself inside another image of an exotic beach. You will use lists to organize which image goes where in your grid.
Tasks
- Project 6: The Warhol Project
1. Make at least 3 more Instagram-style filters
Make at least 3 more Instagram-style filters. Take a look at Andy Warhol's screen prints and have at least 1 of your filters be based on one of his prints. Be creative! You need to do more than simply swap color combinations — there are lots of possibilities!
In your report section called Art Reflection discuss which composition inspired you and what aspects of the compositions you emulated.
1a. Test your filters out using command-line arguments
Update your main code in filters.py to only call your test function.
Allow the user to pass in a second command-line argument to filters.py, which is a string that can be used to check which of one of your image filters should be applied to the image. Be sure to pass it as an function parameter to test and add code to check which filter to apply.
Here is an example of showing the image miller.ppm after it has been processed with the swapBlueRed filter. The resulting image should be saved in your project folder as a PPM file.
python3 filters.py miller.ppm swapBlueRed
You could use none or original to indicate leaving the image alone / not applying any filter.
1b. Instruct the user how to run filters.py
Imagine giving filters.py to a friend and they tried to run your code. The program would crash with a unhelpful error message because they don't know that they need to pass in the image filename as a command-line argument (try it!). Frustrating!
From now on, you will be expected to print a proper usage statement if your program uses command-line arguments (so that the user knows how to run your program!).
In filters.py, check the number of command-line arguments that the user passes in. If the user does not pass in enough command-line arguments, print out how to run your code without crashing. Here is a good example:
Usage: python3 filter.py <filename of image> <filter>
Call the exit function right after printing out the message to stop the program cleanly without crashing.
Test running filters.py with the correct and incorrect number of command-line arguments. For example, running filters.py:
- with no command line arguments should print out your message and exit "cleanly" without crashing.
- with one command-line argument (the filename) should display the image.
- with two command-line arguments (the filename & filter) should display the filtered image.
Take a screenshot of each of the 3 filters applied separately to one image of your choice. Collectively, these are Required Image 1, 2 and 3 in your project. In the caption for each image, include the command line arguments that generate the image and a description of how the filter works.
2. Make your Warhol inspired image
For this project you'll be creating an Andy Warhol inspired image as a 2x2 grid, showing of the same image four times. At least 3 of the 4 panels should show filtered versions of the image (see above Flowers example).
Make a new file called warhol.py. In it, create a main function in which you will write code to create your Warhol.
2a. Write a placeImageInCanvas function
def placeImageInCanvas(canvas, img , topleft_x,topleft_y):

    '''Place the image `img` into the larger image `canvas`. The image `img` should be positioned
    so that its top-left corner appears at (row , col) = (topleft_row, topleft_col) in the large image `canvas`.
    NOTE: (0, 0) is the top-left corner.

    Parameters:
    -----------
    canvas: Image. Larger image `canvas` to place the image `img` on.
    img: Image. Image to be placed on the canvas.
    topleft_x: int. x pixel position (column) in the image `canvas` where the top-left corner of `img` should go
    topleft_y: int. y pixel position (row) in the image `canvas` where the top-left corner of `img` should go
    '''
    pass
2b. Use a list of lists for image placement
Use a list of lists to store information about each image in the image `canvas`. Each sublist relates to one of the four images and has four items:
- the x-coordinate of the top-left corner in the larger image `canvas`
- the y-coordinate of the top-left corner in the larger image `canvas`
- the filter to be applied.
- the
Imageobject
Here is an example with for two images (the original on the left, the filtered version on the right) shown side-by-side:
    imageList = [[0, 0, 'original', img],
                 [img.getWidth(), 0, 'swapBlueRed', img]]
In each sublist, the first two x and y values are positions of the top-left corner of each image in the image `canvas`. You should use methods to get the x and y placement information — don't hard-code values other than 0). The third value is the filter to use (you can use 'original' or 'none' to indicate that the image should be left alone without being filtered). The last entry is the Image object itself.
Requirement: You should use a list of lists to organize each image and its placement properties for your final Warhol Image.
Save a PPM image of your Warhol in your project folder. Take a screenshot; this is Required Image 4 in your project.
3. Alpha Blending 2 Images
Make a new file called alphablend.py. In it, create a main function and a alphaBlending function in which you will write code.
Blend two images together using a technique called alpha blending: for every pixel, you take some fraction α of the (R, G, B) values from one image and add them to another fraction 1-α of the (R, G, B) values from the other image. For example, for any pixel, the red pixel value in final blended image r is a combination of the red values at the corresponding pixels in image 1 (r1) and image 2 (r2):
r = (α)r1+(1-α)r2.
The same equation would be applied to get the green and blue pixel values. The blending fraction, α, is a number between 0 and 1.
def alphaBlending(img1, img2, alpha):

    '''Use alpha-blending to combine 2 images together.

    Parameters:
    -----------
    img1: Image. Image that will be alpha blended onto img2.
    img2: Image. Image that will be blended onto.
    alpha: float. Fraction of img1 that will be added to img2.
    '''
    pass
In your main function, create your two images objects, call alphaBlending and display the alpha blended image.
Save a PPM image of your alpha blended image in your project folder. Take a screenshot; this is Required Image 5 in your project.
Check reproducibility
In order to grade your project, we need to be able to run your code and get the same results as you do!
In your project submission ZIP file, please include any PPM images that are needed run your code.
Here is a summary of the expected outputs from each of the source code files that you created:
python3 filters.py <image filename> <filter name>: Display in a new window the image passed in by command-line arguments with the filter applied to it, also passed in by command-line arguments. (see note about command-line arguments below).python3 warhol.py: Check if the required PPM images in your project folder, it should save a new PPM of your 2x2 Warhol image.python3 alphablend.py: Check if the required PPM images in your project folder, it should save a new PPM of your alpha blended images.
If you use command-line arguments in any file, please explain what they are and provide an example way to run your code in either code comments or your report. It is ok to deviate from the suggested command-line arguments, but you need to document how the user should run your code!
Extensions
Congratulations on completing the core tasks! Between the code that you’ve already written and the report that you write, you’ve already earned up to 26/30 points for this project. If you turn it in by the first deadline that's 27/30 points.
The remaining 3/30 are a chance for you to earn credit for exploring parts of this project and digging deeper to express your creativity! This is entirely optional; 27/30 is an A- and is a perfectly respectable place to stop. Extensions are open-ended and exist to compliment the structured core project. Explore and learn something new that interests you! Concentrating your energy on 2 "deep" extensions that challenge you will earn you more points than many small, "shallow" extensions.
You can pick your own topics that interest you. Here are a few examples:
- Create a larger or more complex Warhol style collage. Place the images in a pattern more complicated than that of a square .
- Make additional (creative) image filters.
- Take in the filter names to apply to your Warhol using command-line arguments.
- Learn how to call a function from a string that has the same name in Python. Use it to simplify how you apply your filters.
- Make a filtered image grid out of different images. To do this, you will need to calculate the size of your image `canvas` that is large enough to fit all your images on it since they may not all be the same size.
- Add additional options to the image placement information list, like whether to mirror the image or not, in addition to the other options.
- Create a image `canvas` dynamically based on how many images are given on the command line.
- Create a Warhol inspired collage with images that overlap. Can be combined with alpha blending (see above extension) to create the effect of transparent overlays.
Submission checklist
To turn in your project, make sure you do all of the following:
- Check the rubric in Google Classroom and make sure your report and code contain all the required parts.
- Move your lab folder inside your project folder (i.e. drag the
Lab06folder insideProject06). - Rename your project folder to include your Colby username. For example, I would name mine
hewolfe_Project6.zip. - Create a zip file of your project.
- Attach (drag) the zip file to the posted project assignment on Google Classroom.
- Click "Turn In" on the Project 6 assignment in Google Classroom.
Appendix C: ImageMagick
This section will help you convert your green screen image to PPM format and those of you interested in applying filters to images of your own.
Install ImageMagick (macOS)
Open up Terminal.
Install Xcode Command Line Tools by entering the following command: xcode-select --install.
Install the Homebrew package manager by copy-pasting the following into the terminal (one long command) then pressing Enter:
/bin/bash -c "$(curl -fsSL https://raw.githubusercontent.com/Homebrew/install/master/install.sh)"
Finally, install ImageMagick by running the following Terminal command:
brew install imagemagick
Install ImageMagick (Windows)
Download and run the installer. As of writing this, the first file ImageMagick-7.0.10-29-Q16-HDRI-x64-dll.exe should work for most people.
Converting JPG to PPM
The graphics library can open only PPM format images, not JPGs. JPG and PNG images are the formats for you will need to use for your reports or for web pages. You can change a JPG to a PPM using a program called ImageMagick. You can run ImageMagick to do the conversion via the convert command in the Terminal (you need to install it first — see the next section below):
convert myImage.jpg myImage.ppm
The convert program is a very powerful application for manipulating images. If you want to find out more about it, check out the ImageMagick web site.
Shrinking an image (for image filters)
You may want to make the images smaller for testing (i.e. your images take too long to process). The following ImageMagick command shrinks an image to 25% the original size.
convert myImage.jpg -scale 25% myImage.ppm
Resizing an image (for green screen)
If you want to use your own image instead of the beach scene for your green screen program, the following converts the original image (assuming it is a JPG) to 512x512, which should take a reasonable time to process on your computer (lower the dimensions if your code is taking too long to finish):
convert myImage.jpg -resize 512x512\! mySmallImage.ppm